It's not a party until you have cake

Make a super cute mini cake
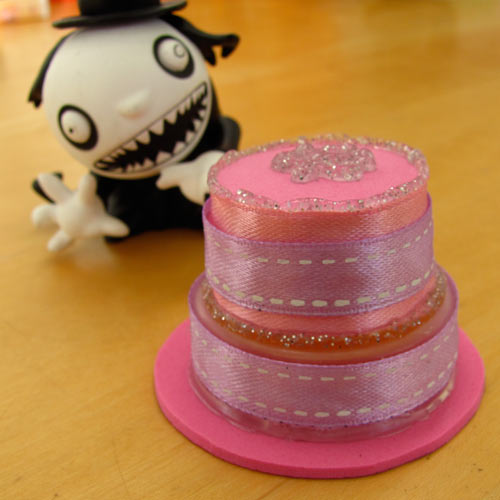
Super cute mini cake by Jen Goode

I love all things cute and tiny so when I saw today’s post about Tiny Party hats at Dollar Store Crafts, I had to chime in with a little cake. A party just isn’t a party until there is some kind of cake, you know. My kids have always played with the tiny plush critters. When my oldest was really young, even McDonalds gave away tons of tiny Beanie babies today. The toys have been passed down from kid to kid so each animal is well loved and probably in need of a celebration. So, I decided I had to chime in with my own addition to this party… cake!
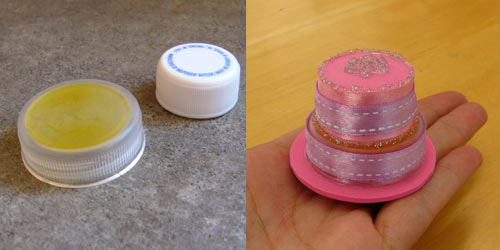
make mini cakes

I had 2 requirements for these mini edibles: 1.  Dollar Store Crafts inspired the idea, I wanted to make sure the cost was relevant. 2. These are items to be played with by kids, so they had to be kid safe/friendly.

Here’s what I came up with for the tiny party fun. I created 2 mini cakes using the lids from various beverage bottles, hot glue, craft foam, glitter glue and ribbon. The lids are recycled items. Hot glue I always have on hand – some say it’s messy to work with, but I love the stuff! The craft foam can be purchased from the Dollar tree (a package of 32 sheets in 6 colors for $1). The glitter glue I also purchased from DT, a package of 4 colors, 2 tubes each for $1. The ribbon I purchased 6 mini rolls in a pack for $1 at Joann.

I’m not sure i can do the math on this one.. what, .50 per cake?
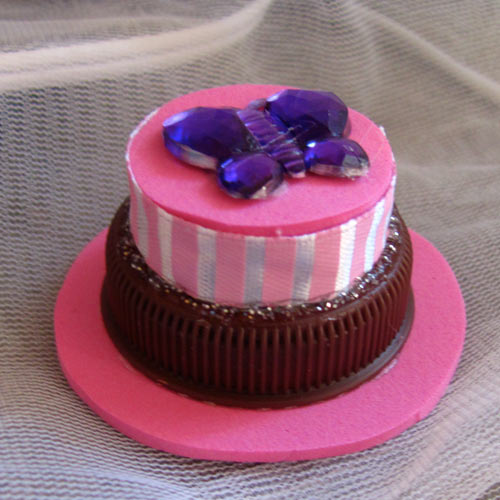
make your own mini toy cake
Mini toy cake by Jen Goode

This one is using a chocolate milk lid and a little butterfly gem I had in my stash. Of course everything is pink.. my youngest is indeed a princess! I think these same little cakes might make cute party place holders. You could also choose to use craft paint, beads, and other embellishments if you weren’t allowing young kids to play with them.
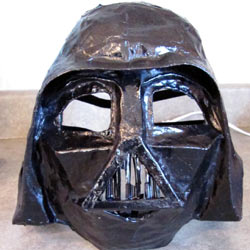
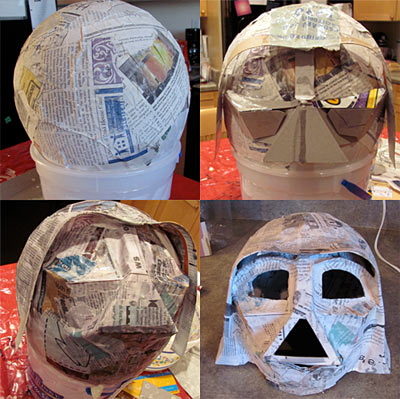
The making of Darth Vader

Paper mache Darth Vader mask
Paper mache Darth Vader mask by Jen Goode

This year I procrastinated the Halloween costume making. My family and I went on a trip the 2nd week of October and I was sure there’d be plenty of time to deal with spooky prep when we got back. We returned October 24th and it was only then that I realized how close everything was.

“What, Halloween is this weekend??” I was really in shock.

My son wanted to be Darth Vader and we had zero ready. Thankfully my daughter wanted to be witch and then a fairy and then a witch… either way, we had enough dress up clothes for her to accommodate a few witch fairy princesses.

I decided the best way to go was paper mache. I’m not a huge paper mache guru, but I can hold my own in the paper craft arena. So off I went, balloon, paper and flour goo in hand… literally.

I took on this mask making task with the mind set that I was sculpting. I first built a standard, rather thin, balloon shape and let it dry.

Making a paper mache Darth Vader Mask
Making a paper mache Darth Vader Mask by Jen Goode

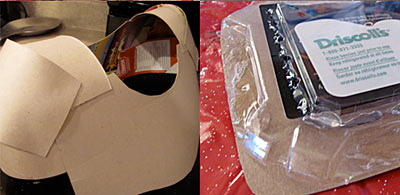
Next, using cereal box cardboard, I created various shapes to form the sculpted face of dear ol’ Darth. Again I added a thin paper mache later and let it dry. I continued the process of adding shapes and then layers of paper mache until I had the form I wanted. I then cut off the back of the balloon shape leaving only the front of the mask. I cut out the holes for the eyes and mouth. added a little more paper mache to clean up the cut edges. I used a portion of a plastic berry container to create the vented fronts of the mouth piece. I used the eye pieces of some old sunglasses for the eye sockets. I hot glued the various pieces and parts together.

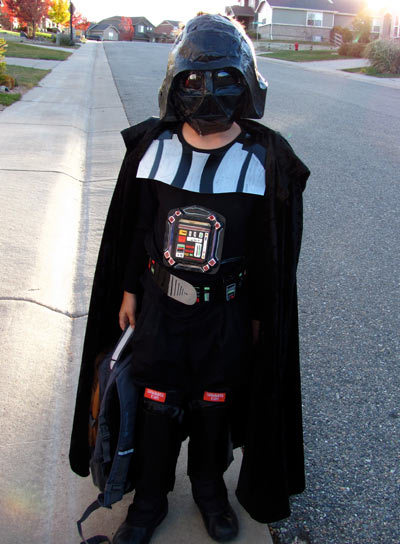
Finally I sprayed the whole thing with black spray paint and then a high gloss varnish. The mask looked a little less bumpy before the varnish, but in the dark no one knew the difference. I glued on elastic in the back to hold the mask on.

The rest of the costume was made with the cardboard from a bunch of cereal boxes. Finally I had a valid reason to be keeping all that cardboard around which drives my husband crazy!

Darth Vader DIY costume
Darth Vader DIY costume by Jen Goode

I made a collar with the cardboard and hot glue. The I made a set of sin guards which were held on with elastic around the back. Using some tiny battery operated lights we had a fancy light up belt and chest computer which was attached via Velcro to an old black shirt. The belt was made of cardboard and a layer of ridged plastic from the berry container with a Velcro piece at the buckle. The I made a fancy little techie chest piece out of the top of the berry container. The belt held the batteries for the lights which included a handy on/off switch… yet we still managed to let the thing run down to dim. All details were painting using my new Marvy Uchida paint pens. It was so much easier to draw on the details than to paint the tiny controls with a paint brush.

Darth Vader costume
Darth Vader costume by Jen Goode

This was a fun project for me. My son was happy and my budget wasn’t busted.

Materials:

  • Newspaper
  • paper mache mix – flour and water
  • Balloon
  • recycled berry container
  • A giant ice cream tub to hold the balloon while I worked on it
  • Black spray paint
  • Hot glue and glue gun
  • High gloss spray varnish
  • Black elastic 1/2″ wide
  • Marvy Uchida paint pens – metallic silver, red, green, blue

Magic in a marker

My daughter has become rather picky about her wardrobe these days. She changes at least 3 times a day and that’s not including the various princess costumes she has to wear throughout her waking hours. This morning was beyond cold so I grabbed some jeans for her to put on. She refused saying “I only like pretty pants”. These, unfortunately, were plain ol’ regular jeans… no bling, no bedazzling or embroidery, you know, the kind we wore as kids.

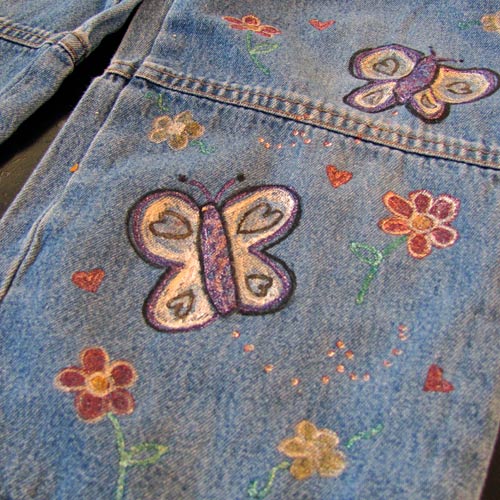
Lucky for me, I just got a hold of some new fabric markers to try out. The package arrived after today lunch and it couldn’t have been better timing. They’re the MARVY Fabric Markers (the fancy glitter variety). I have a pile of fabric paint, but mostly the kind you paint with a brush. In the past, fabric pens and I haven’t always played nice together. Today, with these ” boring pants” being abandoned so quickly I decided to try the pens out on the denim.

Painted kid pants
Painted kid pants by Jen Goode

I was delighted to see how easy these were to draw with. In just over 20 minutes we had some pretty new pants that my darling princess will happily wear (except now we’ve realized they’re too big – ha!). I love how thick the fabric paint is, the color coverage, even on the denim, is fantastic. The pen makes it much easier to draw than the standard paint and brush but the quality of the paint is comparable for sure. I used silver, gold, purple, red and blue… all glittery colors.

I have other colors I’ll try out as soon as I come up with a new fabric project – I love drawing on fabric!

A couple things about using these pens:

  • The tip is great for drawing especially on more dense fabrics. If you want to try to decorate softer fabrics like cotton such as kids t-shirts or leggings I suggest using a brush tip pen instead (MARVY has some nice brush tip fabric pens too). The tip on this particular pen set is a more coarse material so tends to grab at the softer fabrics. However, if you have a layer of paint on the fabric already, these pens would be great for adding extra accents to your work as a second layer.
  • If you want to layer colors on top of each other, make sure you let the first layer dry first, especially with the glitter markers. Otherwise the first layer just absorbs the color of new layers.
  • Make sure you put a layer of cardboard in between your fabric so you don’t have your drawings leaking through to the back of your shirt or even the table. It would be a shame to make a pretty piece of art on the front of a shirt only to find it’s mirror image on the back. I used an old cereal box… creative and caring for the environment all at once!
  • Finally, when you first get these pens you need to release the ink into the nib (pen tip) before starting to draw. The instructions say to shake and then press down (as if to draw) so the ink is released into the nib. Sometimes, on the first try, the pen will release a bit more ink than you’d expect – this is standard with paint pens, not just MARVY pens. To prevent messes or ruining a project, the very first time you press down on the pen, do it on a nice thick stack of paper napkins of paper towels.

Free shipping at Joann.com! Code: AP319You can buy MARVY Fabric Markers and other Uchida products online at Joann.com. At the time of this writing, they were on sale too!

Happy Crafting!

Bed bugs are taking over the universe!

Well not really. My kids have been bugging me for a few months now about getting them pillow pets. Rather than fork out more cash for yet another fad, I made a big deal about how fun it would be to come up with our own and make them ourselves. They bought it! And then they kept reminding me I came up with such a plan.

So, last night we sat down, came up with some design ideas and off to work I went creating what we like to call Bed Bugs. They’re pillow critters created to resemble some kind of bug… that yes, we invented. Imaginations tend to run wild over here sometimes.

Bed bugs by Jen Goode

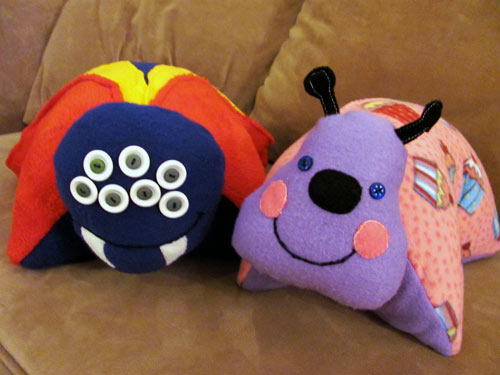
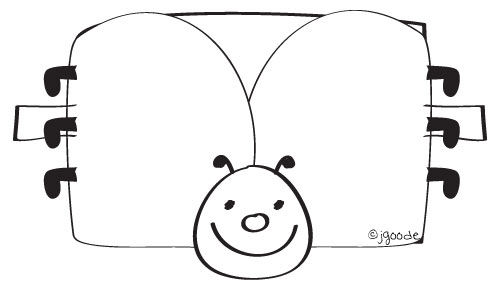
First off is the cupcake ladybug. Her wings are covered in scrumptious cupcakes and little pink poka-dots and double as a big pocket to store those bedtime treasures. She’s got cute button eyes, little rosy cheeks and a soft purple belly just asking for a longer nap time. (We decided to forgo the feet.. they were just asking to be chewed on and pulled off.)

Ladybug Bed Bug by Jen Goode

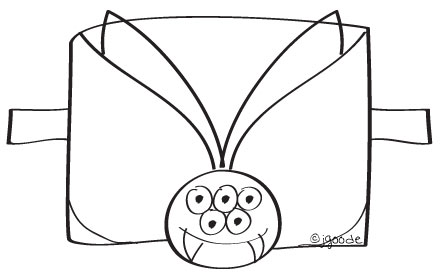
Then we have the less sweet and probably more fattening spider beetle bug, complete in super hero colors – to trick the good guys into thinking he’s friendly. My son mentioned something about “pillow pets have pockets” so I had to make sure this bug did too. Every wing is it’s own individual pocket (there are 4) , perfect for storing Hot Wheels, Bakugan and small tid-bits one finds as they sneak through Dad’s office drawers. This guy was lucky enough to gain a few extra eyes, deviating from the original plan – was already a rebel, even without a head.

Beetle Bed Bug by Jen Goode

Both critters are made of super soft fleece and filled with standard polyfil. I used buttons for eyes and felt and embroidery thread for the other facial accents. Each also has a velcro strap underneath to complete the closure.

I want to send special thanks to Elizabeth at TwelveCrafts who posted a tutorial how to make pillow buddies. I had the body figured out and thought I had the head and then failed miserably… her info helped me re-think and come up with the cute heads we ended up with.

FaveCrafts blog hop
This project is included in this months bloghop at FaveCrafts. Check out what the other designers have created!

Glue for the birds

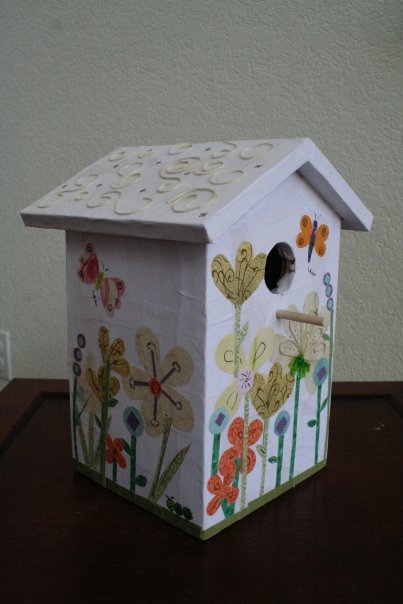
Here is a aThis birdhouse was created a few years ago to donate for an auction at a local gift shop. The procedes from the auction were then donated to the local Habitat for Humanity.

Bird House by Jen Goode

The entire piece is layers of various patterned papers and plain paper string that was adhere to a plain wood birdhouse by simply painting glue. Similar to decopague. I then drew in little details here and there with a fine point black pen.

I love the texture effect that results from layer paper like this. It ends up shiney and thick and becomes one with the form you’re covering. I miss this lil’ bird house, but so glad it could help a great cause!

I’m sharing this today as part of the Cool2Craft theme of the week… GLUE!

My favorite glue: hot glue. I’d hot glue everything if I could.

Under the sea for charity

The CHA summer show is fast approaching, and as much as I loved attending the CHA winter show in January, I am unable to attend this next upcoming event. However, my art will be there! I was asked to participate in an fund raising event for the Wyland Foundation. There will be a silent auction with the proceeds going to help educate children about the environment and conservation.

The theme for the even is “Under the Sea”. Living in the middle of a land locked state, I rare have the opportunity to experience anything relating to the ocean first hand, so this project was particularly fun for me to imagine.

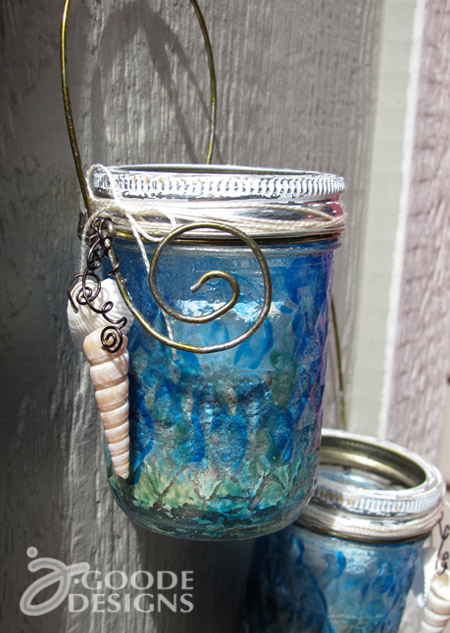
The first item I made is a pair of hanging votive holders. I imagined walking along the beach at night near old wood posts, each glowing from a single hanging candle.  I tried to create this same kind of deocr item that can be used both inside and out. Each glass jar is hand painted using enamel paints from Plaid. The lids were painted with several different shades of craft paint and then sanded for a weathered look. Then I added the hanging handle and large swirl embellishment by bending a wire clothing hanger. Finally I added small bent wire accents along with hanging sea shells and a bit of thin twine. Finally, each candle holder was partially filled with sand and a small votive candle was added.

hanging votive holder for charity event

The second donated item I created was a summer outfit for a toddler girl. The inspiration for this piece was the vision of an afternoon picnic on the beach with a cool breeze. The skirt was sewn using re-purposed linen which I then stamped with fabric paint using 3 seashell design I hand cut in craft foam. Both the skirt and top also incorporate white eyelet fabric.

hand sewn summer outfit for charity event

hand sewn little girl outfit for charity event

I’m so thankful this was a summer themed project, had it been winter I would have been inspired to knit… not one of my strengths.

Fun with bows you can make yourself

I absolutely love gift wrapping and all the fun accesories that go along with it. To me, the presentation of a gift should show as much love for the person as the gift itself. It’s an opportunity for a message – a moment to say “HEY YOU, you’re special to me” before the gift is even opened.

I’ve always loved the task of wrapping presents. So I am especially thrilled with this last in the series of blog hop posts for Eileen Hull‘s Sizzix Scoreboard dies. It’s a make-it-yourself bow aka “create-a-bow” – love it! Rather than get creative and try to make something new out of the bow shapes, I decided to keep this one simple and just enjoy the love of the gift bow.

The die itself cuts 3 different paper strip sizes and a couple button shapes but the possibilities for bow making is not limited to a single bow type. There’s a number of ways to bend the paper strips or alternate sizes to create a variety of bow styles. I’m especially excited about the idea of being able to make my own bows to coordinate however I like. I can make my own patterns or use favorite papers, even fabric. Mix and match colors instead of sticking with the standards at the store.

This is definitely my favorite Sizzix project, how can we not be happy making gift bows? Bows often remind me of flowers and today I was thinking a big ball of bows would make a fantastic hydrangea, or the three piece bow could be a pansie, thus the color selection for today’s project.

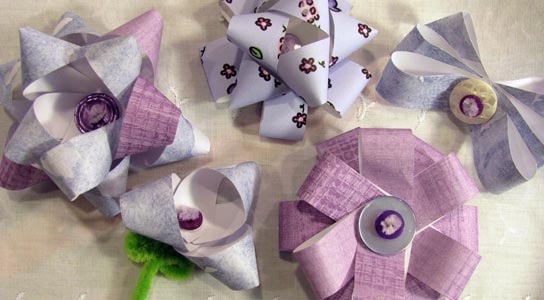
Here are a few of the bows I came up with, the center middle is my own pattern design as well.

Make your own gift bow with Sizzix

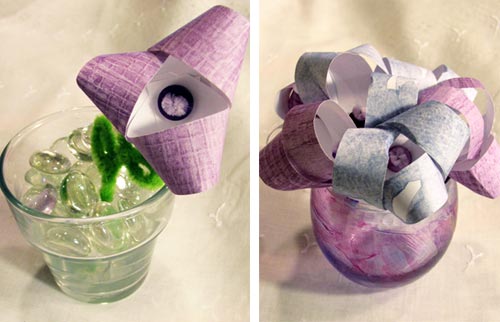
And here  are two cute little center piece or party decor ideas, both using small votive candle holders.

Cute center piece decor with Sizzix bow die by Eileen Hull

I chose to use pipecleaners and real buttons to put together my bows. You can use a variety of items to assemble these, including a standard brad or the paper button shape that comes within the die.

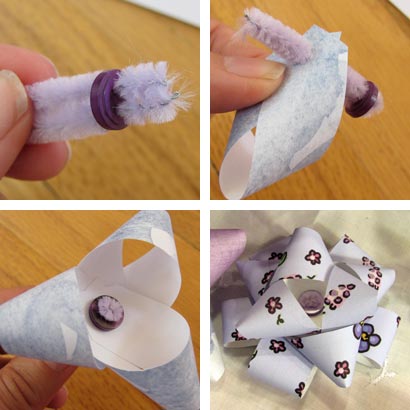
Here’s an example of how to make a standard bow:

  1. cut a small piece of pipecleaner, fold it in half and run through the holes in the button.
  2. use one paper strip and loop it so the corners overlap eachother, same side facing up.
  3. Push the pipecleaner through the holes in the paperstrip until the button is flush with the paper.
  4. repeat with additional paper strips until the bow is the size and look you want.

How to make a bow with Eileen Hull's Sizzix bow die

If you’d like to get a hold of the create-a-bow, visit the Sizzix shop online.

Check out more great make-your-own bow project ideas from the following websites:

Ann Butler

Bonnie Bruns

Candice Windham

Craftside-A behind-the-scenes peek at a crafty world

Debra Quartermain

Eileen Hull

Einat Kessler

Life in the Craft Lane

LollyChops

Michelle Cummings

Modern Surrealist Marisa Pawelko says CHEERS to the Sizzix Blog Hop!

Roxi Phillips

Sparkle’s Bow Bracelet

Veronica Goff

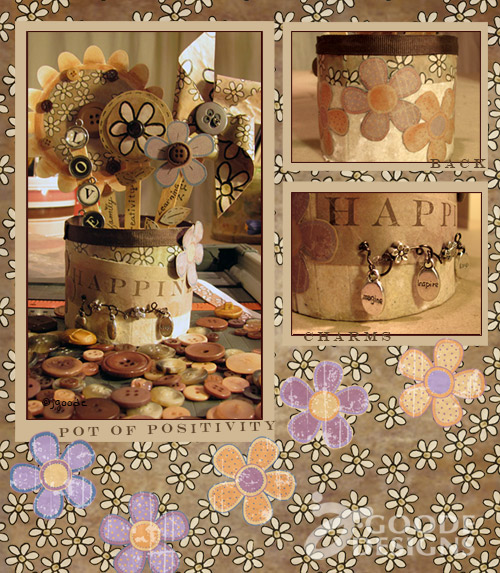
A few of my favorite things in a pot of positivity

This is round 4 of the blog hop with Eileen Hull and her fabulous Sizzix scoreboard dies. Read below how you can win a cool prize just for commenting.

This particular project is utilizing the cake shape, but I was feeling a bit springy (despite the once again snowy weather in my backyard) so instead I turned the cake into a flower pot.

A few of my favorite things in a pot of positivity

I’m particularly proud of this piece because…

  1. All graphics I created myself and actually used. I created a few patterns and some stand alone images that I cut out and pieced together. I tend to make a lot of things for other people to use but rarely have the opportunity or think of how to use it myself.
  2. I really love the style. The vintage, grunge, steam punk, weathered styles I see, but rarely have an opportunity to work on myself. I’ve created a number of art pieces using this style, but don’t often have anywhere to show them off. The color schemes and idea of combining old and new has always been a favorite.
  3. I love to share ideas about happy things. The “challenge” this time was “my favorite…” which I suggested to Eileen a few weeks ago and she actually liked the idea and decided to use it. Then my  struggle was deciding on a “favorite” to include. I couldn’t – so I combined ideas… thus the idea of a “pot of positivity”.
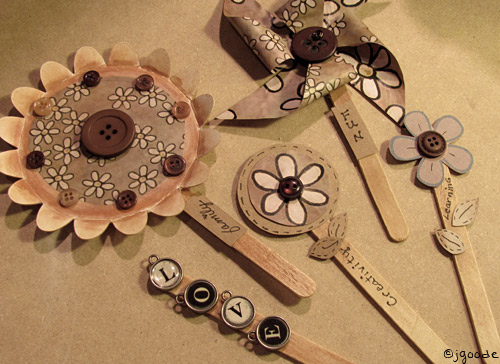
  4. I incorporated a number of things I particularly like – which again, I don’t do as often as I’d like. Some of the things I included are: daisies, swirly lines, the color scheme, some hand doodling (using a real ink pen vs a computer pen), various textures and materials combined in one project (wood, fabric, paper), and concepts.I love to include things that one can ponder over and over so I included the words “love”, “family”, “fun”, “learning” and “creativity” as ideas that can spark a thought at any time . Similar to the idea of a little wishing stone, each flower can become a focal point for an idea.More things to think about: The front says “Happiness” and there are 3 dangling charms that read “imagine”, “inspire” and “laugh”.
  5. There’s a purpose to it. This is something tangible that can be handled, inspiring ideas – each flower is removable and can be held, thought about, moved around. Even the pinwheel really moves.

I had no idea what I was going to do when I started this project, I’m excited to have this turn out from allowing myself to just create without planning ahead.

happy thoughts flowers

Some other fun things I included…

  • Chalk. While at the CHA winter show I picked up some neat craft chalk from Craft-t. I used it for the first time with this project for tinting the popsicle sticks, and large flower. I LOVE IT! Some of the chalks even has a fun bit of sparkle to them, very fun.
  • Buttons. I love the look of buttons – but never have a reason to use them. Over the weekend I found an entire bag of brown buttons I forgot I had, so here they are.
  • I still used hot glue and mod podge – something amazine will have to come along to replace both if I’m every going to stop using either.

comment to win
Enter to win a Sizzix die by clicking to visit Eileen's blog and leaving a comment

Take a moment to check out what the other designers have done with this fun Sizzix cake die. There is crazy cool creativity going on around here! (plus you could be the randomly selected winner for a neat prize if you leave a comment on Eileen’s blog!)

Ann Butler

Bonnie Bruns
Candice Windham
Craftside-A behind-the-scenes peek at a crafty world
Debra Quartermain
Eileen Hull
Einat Kessler

Just a Thought or Two
Karen Burniston
Laura Bray
Life in the Craft Lane
Lisa Rojas, Stampin’ Queen Creations
Modern Surrealist Marisa Pawelko
Niki Meiners

Roann Mathias Calligraphy
Sandy Laipply